

How To Clean the Apple Keyboard
There comes a time, when your shiny white Apple keyboard gets so dirty that you can’t bear one second more. For me, that day was today.
I love the Apple keyboard, it is nice, ergonomic and looks very sleek. However the only ‘disadvantage’ (if you could call it that) is that it is white. It gets dirty easily and you can see really clearly everything.
A simple wipe of the keyboard with a damp cloth was not enough. There was still remains of tons of different things, and I wanted it off.
You never really notice how dirty your keyboard is, unless you use a white keyboard, or something of a similar colour.
But with the Apple keyboard, the outer shell is clear, so you can see everything there too.
This little how-to guide will show you how I cleaned my keyboard to perfection.
Check out
Best Compatible Mac Mini Keyboards
Best iPad Magic Keyboard Alternatives
Scroll on for the detailed guide (with lots of photos).
What you need to know?
How To: Cleaning the Apple Keyboard
The Apple Keyboard may be one of the best functioning keyboards built for the Mac and though it’s unmatched in terms of performance, it does tend to get dirty rather fast.
Cleaning your Apple Keyboard is an easy task but you must do it right so there’s no damage to the keys or the chip-set.
While you can use a soft cloth the wipe away the dust and grime, i’ll take you through how you can clean the Apple Keyboard so thoroughly with 5 simple steps, that it’ll feel like you’re using a brand new one.
Points to Note before Cleaning Your Apple Keyboard
- The very first thing you need to do, is grab a camera, anything in which you can later use to read the keys is enough.
- Take a picture of the keyboard, a few would be helpful, so that you can remember what keys go where.
- You mustn’t miss this step, otherwise you will be spending hours trying to find out what key goes where.
- A few of the keys (right shift, enter/return (both), backspace, space and the zero (number-side key) contain these ‘attachment clips’, as can be seen above, that are used to make sure it is evenly pressed down.
- Please make a note of which one is attached to which key, this will save you a lot of hassle. I forgot, and I can’t put it back into the remaining place, because the key doesn’t operate properly.
It is not a pleasant experience. If you can zoom in on your camera, and see the keys then you are fine. But if you can’t then transfer the photos onto your computer and put them on the screen, or print them out.
Remove The Apple Keyboard Keys
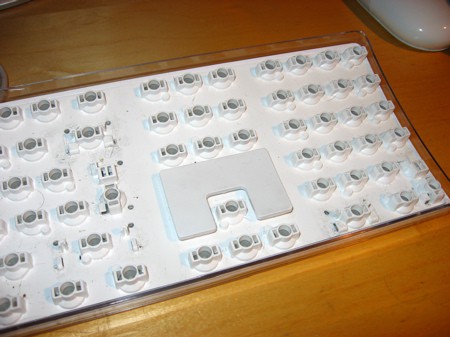
- You will start by removing each key one by one.
- The easiest way, is to tuck your finger under one of the buttons between the small gap that separates the directional keys from the rest of the keyboard.
- You need to be careful and don’t rush. If you pull too hard it could break the clip that holds it onto the keyboard. That would be really annoying, as well as frustrating.
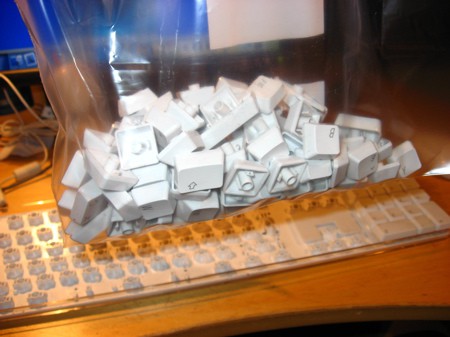
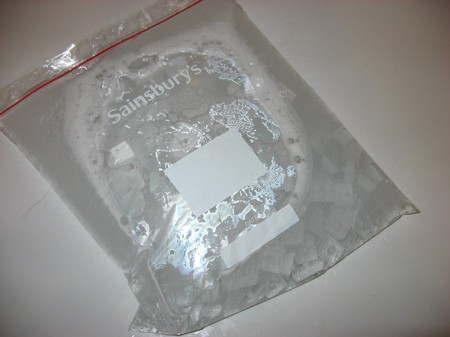
- What you need to do next is gather up all the keys and put it in a re-sealable bag.
- For this I used a standard zip-lock bag that you can find at any grocery store (used for freezing food). It is perfect and allows plenty of room for all the keys, and the water to come.
Clean the Apple Keyboard Keys
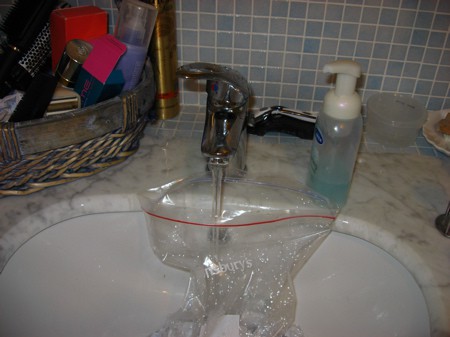
- Next comes the water. Make sure you use warm water. Fill it up about 3/4 full so that all the keys are engulfed with plenty of room to spare (for the keys I mean).
- Once you feel that you have enough water in the bag, add some soap. For this I used a ‘foaming’ soap that comes out as foam out of the bottle.
- You can use a ‘gel’ type soap as well, however that is probably harder to lather. Give a good few squeezes of the bottle so that there is plenty to go around.
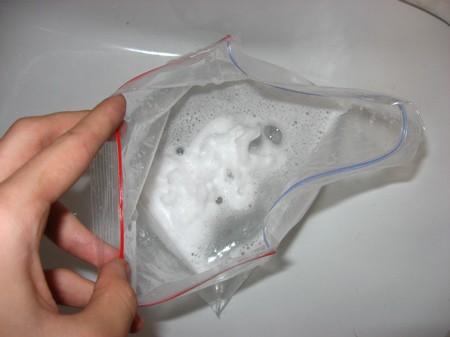
- Next you need to seal the bag tightly, making sure that there are no gaps in the bag. After this, shake! Not too vigorously, as you don’t want the bag to pop and the buttons going anywhere.
- Shaking for about 3-4 minutes, with a short break in between (~ 1 min) will allow the soap to clean the buttons and fill all the nooks and crannies.

- Now you need to open the top fully and wrap your fingers around the top portion. Then rotate the bag upside down letting the water trickle out.
- If you want you can rinse it through with cold water to remove any excess soap, though this is rendered useless by the next step.
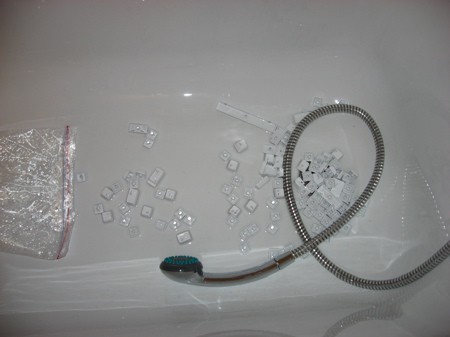
- Empty the keys into an empty bath or wash basin. I then used the high-power setting of the shower head to remove the remaining soap and dirt from the keys.
- It will most likely not be cleaned completely, because of the grease/oil used to lubricate the attachment clips.
- Rinse for a minute or two, preferably with some warm water.
Drying The Apple Keyboard Keys
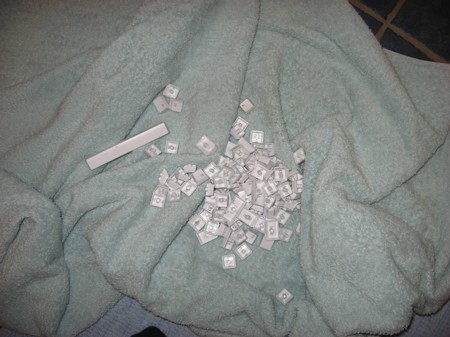
- Transfer the keys onto a clean towel.
- Grab the keys in a bunch and shake before you put them onto the towel. This will remove a lot of water, so the drying time is reduced.
The way you do this next part is up to you.
- I mixed the keys in the middle, and with a firm but gently grasping action rubbed the keys against the towel.
- Do this for a minute or two, until the keys are mostly dry, but not totally. Leave this to dry for around 5-10 mins, during that time you can do the next few steps.
Clean The Surface Of Your Apple Keyboard
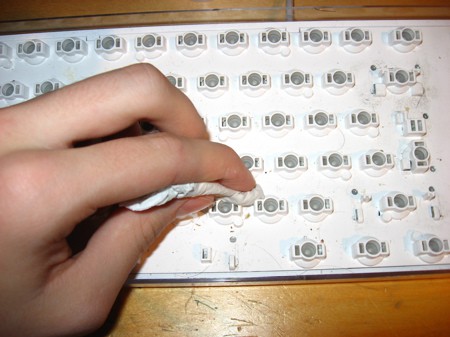
- You don’t just want the keys clean, but the surface of the keyboard! Grab a paper towel/kitchen towel and damp it in water.
- Make sure you use sparing amounts, as not to get any onto the electronics; it can seep through the hole where the keys affix to.
- If you have a keyboard duster, then you can move onto the next step once most of the dirt is removed. However if you don’t then you will need to spend a while to remove all the dirt and grime, it is quite painstaking!
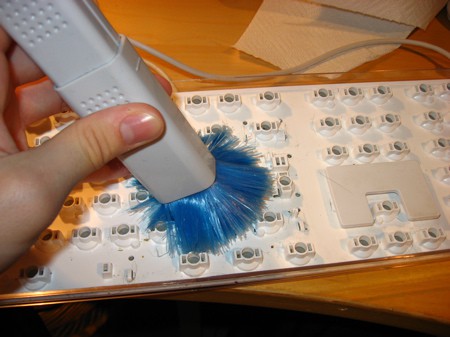
- With the duster go over the key spaces and push quite hard to shift away the dirt. This is really important, as the grease from the attachment clips can cover the surface, causing it to attract dust, which is harder to separate.
- A good idea is to do this over a sink, or outside so that you don’t make a mess. After all we are removing the dirt, you don’t want to put it onto the floor, do you?
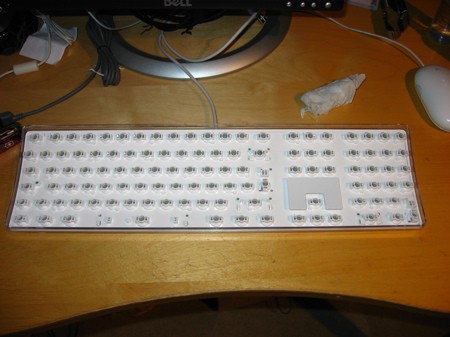
- At last, your keyboard surface is now clean!
- Go back to your keys now, and place them onto a table close to the keyboard, making sure that each one is free of water. If it isn’t then go back and use a kitchen towel (or something similar) to remove the remaining water.
Fix The Keys On The Apple Keyboard
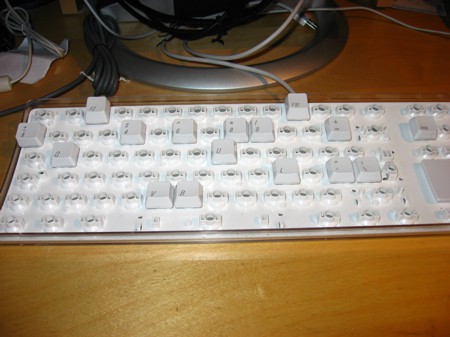
Using the reference steps laid out above, it becomes easier to re-fix the keys on your Apple Keyboard. Make sure to have a photograph or a video of the correct layout for your keys so you can firmly fix them back in their appropriate space.
This task can prove to be time consuming if it’s not carried out accordingly.
FAQ
Q: Why don’t you put it through the dishwasher / washing machine?
A: Yeah, I’ve heard that one too. But I use my Mac a lot, and it will take much longer to wait for everything to dry. Even then there is a risk that the keyboard won’t work. Dishwashers and washing machines have chemicals in their detergent, as well as salt, which could damage the electronics. The heat could fry it too. Yes, you could remove the detergent and the heat, but then there isn’t any soap. This was much simpler for me. If you want to, you can try it, but I can’t be held responsible for any errors you make.
Q: There seems to be some sort of oil under the keys. What is it, can I remove it?
A: This is from the grease that lubricates the ‘attachment’ clips so that they can move freely. As long as you don’t remove it from these clips, it is fine to clean it from the keys and the keyboard. If you find that it doesn’t work, you can always remove the clip (not really ‘essential’ for the smaller keys), buy some more lubrication grease at a DIY or electronics shop, and then use it sparingly on the clips and replace.
Q: Does this work for the Bluetooth keyboard, or on laptops?
A: From what I know, the cleaning process for the Bluetooth version of Apple’s keyboard should be the same. However if you are going to try and clean underneath the white plastic, be careful as you could damage the electronics. Make sure to remove the battery first though!
For laptops, the keys a very different, as they contain two ’scissor’ clips which can be very hard to refit. They also come loose very easily so if you do clean it, then be very careful. Underneath the keys, the electronics is tightly packed, so you should only wipe with a dry cloth or a duster. I wouldn’t venture into this area, as I would hate to pay to replace the keyboard, they are very expensive. If you do though, anything you do is at your own risk!
Q: Why don’t you try [insert idea here]?
A: I probably never heard of it, or I was weary of trying it in case the keyboard failed. This worked absolutely perfect for me.
Q: What is the point in this? Can’t you just buy another keyboard?
A: I suppose I could but the nearest Apple store is around 50/60 miles away. I know I could go online, but why should I pay money for a new keyboard when this works perfectly. It’s not like I don’t have any time. It didn’t even take that long.
Q: It doesn’t take a rocket scientist to figure out how to do this, this is useless!
A: If that’s what you think, I’m cool with that Now onto the point: For those who are inexperienced, or are scared of doing it in case something goes wrong, or just don’t know how to do it, it is very useful and can be of great benefit. That’s what most people have said, anyway.
Q: So how long did it take?
A: Not as long as you might think. The whole process took around 50 mins. Around 25 was spent cleaning the keys, 15 for the whole keyboard and another ten for putting it all together and finding all the keys. I nearly lost one!
Q: What kind of a geek are you, can’t you remember the layout of the keys?
A: I know where 98% of the keys go. I can touch type pretty well, however with the ’symbol’ keys like the square brackets, tilde (~) and ‘§’, as well as the page up, down and those sorts of keys, I would probably get them confused. I took the picture so that it would save me time, and I did use it in the end. Also on the number pad keys, I wouldn’t know where the add, subtract, divide and multiply symbols would go. It saves time.
Takeaway
This is how i wash my Apple Keyboard and these steps can be applied to the new Mac Air Keyboard as well.
While there are many ways you can clean your Apple keyboard, I feel that this is by far the safest and best way to get rid of all the grime and dirt in between your keys without damaging the keyboard itself.
So, hope you have fun cleaning your Apple Keyboard.
I hope you enjoyed this tutorial, feel free to ask any questions.
Read Also:
Best Cheap Chinese Mechanical Keyboards
How To Clean Your Dirty AirPods

Tyrone Young is an award-winning author, researcher and the founder of TheMiniBlog. He has been a content marketer for over 10 years and his main goal is to provide readers with quick hacks, guides and reviews on everything Mini. Based out of the UK, Tyrone likes to take long walks on the beach and take care of his two puppies when he’s not busy writing.


One Comment
Comments are closed.